In early 2019, Cloudflare introduced BoringTun, an implementation of the WireGuard protocol written in Rust. The project code is distributed under the BSD-3-Clause license and consists of two main parts:
- The executable
boringtun, an userspace WireGuard implementation for Linux and macOS. - The library
boringtunthat can be used to implement fast and efficient WireGuard client apps on various platforms, including iOS and Android. It implements the underlying WireGuard protocol, without the network or tunnel stacks, those can be implemented in a platform idiomatic way.
Later in 2019 Cloudflare released the free VPN “for people who don’t know what V.P.N. stands for” called WARP. Nowadays WARP/BoringTun is successfully deployed on millions of macOS, Windows, iOS and Android consumer devices as well as thousands of Cloudflare Linux servers.
WireGuard VPN clients for Windows
Meanwhile, there are two “universal” WireGuard implementations available for Windows (we do not consider specialized solutions of various VPN providers):
- WireGuard for Windows is a reference implementation authored by Jason A. Donenfeld. It can be used both as a client and as a server (unofficially). Until recently, it was built on top of wireguard-go (implementation of the WireGuard protocol in user space, written in the Go language) and the WinTun virtual network interface. Starting August 2021, this implementation was gradually superseded by a new version implemented entirely in kernel mode – WireGuardNT. The latter is a virtual network interface, which implements the WireGuard protocol, and uses Windows Kernel Sockets (WSK) for the transport.
- TunSafe is an alternative user space implementation by Ludvig Strigeus. It can only be used as a WireGuard VPN client. Written mostly in C++ using assembler for the most performance-critical encryption functions. It uses the NDIS 6 TAP-Windows driver as a virtual network interface, the same one used in OpenVPN.
Both WireGuard clients above use a routing table to redirect network traffic to the virtual VPN interface, where it is encrypted, encapsulated and sent to the server via a UDP socket. The same approach is used in the vast majority of VPN clients. And going forward, WARP from Cloudflare is an exception to the rule.
However, it is worth mentioning certain limitations of this approach:
- The inability to define application-specific rules. Imagine the situation when you would like to route only certain applications through the VPN tunnel, bypassing everything else. This is, generally speaking, a fairly popular VPN related question. For example, one user wanted Firefox to work over a VPN and Google Chrome to connect directly. Another required the use of a VPN exclusively for qBittorrent, and it was also desirable that the latter should not be able to connect to the network when the VPN was inactive.
- When it is necessary to exclude tunneling for some networks (for example, home LAN) from the global ‘0.0.0.0/0, :: 0/0’, then you cannot simply specify the ‘DisallowedIPs’ parameter, you need to calculate the addresses for AllowedIPs considering the excluded networks. To avoid mistakes, you can use a ready-made calculator, but it will still be far from convenient.
Here we come to the idea of a “transparent” client for WireGuard, which would use a reliable implementation of WireGuard protocols, allow defining rules for applications, if possible, did not modify the network configuration, and at the same time would be sufficiently performant and compatible with the “reference” WireGuard implementation.
Build your own world
Despite the seeming complexity of the task, it turned out to be not so difficult to assemble a ready-made solution as a console application (service) for Windows. All the main components are available on GitHub, you just need to arrange them in the correct order and link them together.
To intercept network packets, we will use the Windows Packet Filter library. Without going too much into details, for Windows Vista and later, it is represented by the NDIS 6.0 Filter Driver, which provides an API that allows a user-mode application to fetch packets from the network stack, optionally modify them, and then inject back. The above BoringTun library will provide us with support for WireGuard VPN protocols.
The only thing that confuses me a little about the BoringTun library interface, and that I would like to point out separately, is the impossibility to pass the PresharedKey parameter to the new_tunnel function (see below). And since the PresharedKey is used by default by most WireGuard autoconfiguration scripts for Linux, this is a nuisance. So, I submitted a pull request a while ago that fixed this situation. However, one gradually gets the impression that the maintainers are not particularly interested in this. I don’t know for sure, but maybe the reason is that WARP is not using PresharedKey.
Since I have already mentioned the PresharedKey parameter, it is worth explaining its role in the WireGuard protocol. Imagine that something “incredible” happened and the elliptic curve public key encryption algorithms were vulnerable. In addition to the bitcoin crash and the chaos on the cryptocurrency exchanges, all SSH/TLS/VPN sessions that used elliptic curve public key cryptography and were carefully recorded and stored by the NSA for just such a case would be in risk. To avoid this unfortunate situation in the future, a 256-bit symmetric key has been added, providing another additional layer of cryptographic strength.
So, first we need static library builds of the BoringTun:
- Let’s add a few lines to .cargo/config.toml:
<strong>[target.x86_64-pc-windows-msvc]
rustflags = ["-Ctarget-feature=+crt-static"]

[target.i686-pc-windows-msvc]
rustflags = ["-Ctarget-feature=+crt-static"]</strong>

[target.'cfg(unix)']
runner = 'sudo -E'- And to boringtun/cargo.toml
[package]
name = "boringtun"
description = "an implementation of the WireGuard® protocol designed for portability and speed"
version = "0.5.2"
authors = ["Noah Kennedy <[email protected]>", "Andy Grover <[email protected]>", "Jeff Hiner <[email protected]>"]
license = "BSD-3-Clause"
repository = "https://github.com/cloudflare/boringtun"
documentation = "https://docs.rs/boringtun/0.5.2/boringtun/"
edition = "2018"

[features]
jni-bindings = ["ffi-bindings", "jni"]
ffi-bindings = []

[dependencies]
base64 = "0.13"
hex = "0.4"
untrusted = "0.9.0"
libc = "0.2"
parking_lot = "0.12"
tracing = "0.1.29"
ip_network = "0.4.1"
ip_network_table = "0.2.0"
ring = "0.16"
x25519-dalek = { version = "2.0.0-pre.1", features = ["reusable_secrets"] }
rand_core = { version = "0.6.3", features = ["getrandom"] }
chacha20poly1305 = "0.10.0-pre.1"
aead = "0.5.0-pre.2"
blake2 = "0.10"
hmac = "0.12"
jni = { version = "0.19.0", optional = true }

[target.'cfg(target_os="macos")'.dependencies]
nix = "0.24.1"

[dev-dependencies]
tracing-subscriber = "0.3"
criterion = { version = "0.3.5", features = ["html_reports"] }

[[bench]]
name = "crypto_benches"
harness = false

<strong>[lib]
crate-type = ["staticlib"]
bench = false</strong>- Then you can build all the necessary library configurations from the command line or using a simple script:
cargo build --target=i686-pc-windows-msvc --lib --features=ffi-bindings
cargo build --target=i686-pc-windows-msvc --lib --release --features=ffi-bindings
cargo build --target=x86_64-pc-windows-msvc --lib --features=ffi-bindings
cargo build --target=x86_64-pc-windows-msvc --lib --release --features=ffi-bindings
As a result, we will get a static library that provides all the necessary functions for creating a WireGuard tunnel, generating handshake messages, encrypting and encapsulating outgoing network packets, decapsulating and decrypting incoming network packets (belonging to the WireGuard tunnel), as well as keeping the tunnel up to date (generating handshake every two minutes and sending keepalive packets).
The BoringTun library API looks like this (see boringtun/src/wireguard_ffi.h):
// Allocate a new tunnel
struct wireguard_tunnel *new_tunnel(const char *static_private,
                                    const char *server_static_public,
                                    const char *preshared_key,
                                    uint16_t keep_alive, // Keep alive interval in seconds
                                    uint32_t index,      // The 24bit index prefix to be used for session indexes
                                    void (*log_printer)(const char *),
                                    enum log_level log_level);

// Deallocate the tunnel
void tunnel_free(struct wireguard_tunnel *);

struct wireguard_result wireguard_write(struct wireguard_tunnel *tunnel,
                                        const uint8_t *src,
                                        uint32_t src_size,
                                        uint8_t *dst,
                                        uint32_t dst_size);

struct wireguard_result wireguard_read(struct wireguard_tunnel *tunnel,
                                       const uint8_t *src,
                                       uint32_t src_size,
                                       uint8_t *dst,
                                       uint32_t dst_size);

struct wireguard_result wireguard_tick(struct wireguard_tunnel *tunnel,
                                       uint8_t *dst,
                                       uint32_t dst_size);

struct wireguard_result wireguard_force_handshake(struct wireguard_tunnel *tunnel,
                                                  uint8_t *dst,
                                                  uint32_t dst_size);

struct stats wireguard_stats(struct wireguard_tunnel *tunnel);
The purpose of each function is clear from its name. But since the documentation for BoringTun is only available for the Rust crate, let’s quickly go over the most important ones.
new_tunnel – creates and initializes a WireGuard tunnel. In the current version of BoringTun, there is no PresharedKey parameter, so the above function is a slight extension of the original one.
tunnel_free – frees up the existing WireGuard tunnel.
wireguard_write – accepts an IP packet as input, encrypts and attaches the WireGuard protocol header. It is important to note that the supplied input and output memory buffers must not overlap.
wireguard_read – accepts a WireGuard protocol packet as input, decapsulates it (removes the WireGuard protocol header) and decrypts it. The above remark about overlapping input and output memory buffers for this function is also true.
wireguard_tick – this function should be called periodically for each active WireGuard tunnel. The interval recommended by the developers is 100 ms. The function can return a handshake (every two minutes) or a keepalive packet (depending on the value of the PersistentKeepalive parameter) to be sent to the server, or an error condition.
wireguard_force_handshake – generates a WireGuard handshake package. This function is usually used to initiate a WireGuard connection (further handshake packets are generated by the wireguard_tick function) or when it is necessary to reconnect to the server due to a change in the network connection, IP address, etc.
wireguard_stats – queries the current tunnel statistics, which includes the elapsed time since the last handshake, the number of bytes received and sent, the estimated packet loss and RTT (Round-trip delay time).
Since Windows Packet Filter includes a sufficient number of examples of how to organize packet filtering on a specific network interface, I will not dwell on this in detail. For example, you can use the ready-made simple_packet_filter C++ class by passing two lambda functions to it to process incoming and outgoing packets, respectively. In what follows, we will assume that we have two such functions, filtering the network interface connected to the Internet.
Thus, to create and maintain a WireGuard tunnel, you need to do the following:
- Call the new_tunnel function and pass the parameters obtained from the configuration file to it.
- Call wireguard_force_handshake function and send handshake in UDP packet to WireGuard server.
- Create a thread that periodically calls the wireguard_tick function and sends the result of its work (handshake and keepalive messages) to the WireGuard server.
- Start filtering incoming and outgoing network packets:
- For outgoing network packets (simplified workflow):
- Check if this packet should be sent through the VPN tunnel.
- If not, then immediately return it to the network stack, take the next packet and return to the previous step. Otherwise, proceed to the next step.
- Change the source IP address to the IP address specified in the configuration file, and recalculate the necessary packet checksums.
- Pass the packet to the wireguard_write function, add UDP and IP headers to the result, calculate the checksums and inject the resulted packet into the network stack.
- For incoming network packets (simplified workflow):
- Check if the received packet belongs to the WireGuard tunnel.
- If not, then immediately return it to the network stack, take the next packet and return to the previous step. Otherwise, proceed to the next step.
- Extract the payload from the UDP packet and pass it to the wireguard_read function. If the packet is successfully decrypted, then change the destination IP address to the IP address of the network interface, recalculate the checksums and inject the modified packet into the network stack.
- For outgoing network packets (simplified workflow):
The client architecture described above is missing a number of implementation details that would be too long and tiring of the reader. In my opinion, it is much more interesting to see if a client based on the BoringTun library and working in user space can provide performance comparable to existing solutions. Or is it purely theoretical interest. By the way, for those who are interested, the current version of the WireGuard console client can be taken from here.
Citius, altius, fortius
For benchmarking, I used an Intel® NUC DC3217IYE (Core i3-3217u) released about nine years ago. This relatively outdated equipment was chosen for a reason. It allowed to observe the difference in performance of VPN clients on a gigabit network. At the same time, comparative tests of modern CPU would require at least a 10-gigabit network and unfortunately, it was not at hand. The table below shows the best results in 10 test runs using four parallel TCP threads (one per processor thread) for maximum CPU utilization.
| iperf3 -c 10.66.66.1 -P 4 (upload) | iperf3 -c 10.66.66.1 -R -P 4 (download) | |
| WireSock VPN Client v1.0.46 | 879 Mbits/sec | 892 Mbits/sec |
| WireGuard for Windows (kernel driver) v0.5 | 892 Mbits/sec | 719 Mbits/sec |
| WireGuard for Windows (WinTun) v0.4.1 | 288 Mbit/sec | 325 Mbits/sec |
| TunSafe v1.4 | 435 Mbits/sec | 284 Mbits/sec |
To be honest, the results surprised me a little. BoringTun-based WireGuard VPN client running in user space in terms of ultimate throughput has been able to catch up with the kernel mode reference implementation (WireGuardNT) presented in August 2021. And, most likely, not the least thanks to the BoringTun library, which serves as a great illustration of where and how you can use Rust in modern realities.
In addition to impressive performance, the new client can offer some useful functional extensions:
- Selectively tunnel applications using the optional AllowedApps parameter in the Peer section.
- Exclusion of the specified network addresses from the tunnel using the additional parameter DisallowedIPs in the Peer section.
- Windows 10 Mobile Hotspot compatibility. Mobile hotspot connected clients will work through the VPN tunnel configured on the host.
- Can be used with official WireGuard for Windows to organize nested WireGuard tunnels completely on the client side. In such configuration, the official client organizes the external tunnel (to the first WireGuard Server instance) and WireSock VPN Client the internal one (to the second WireGuard Server instance). You only need to remember to adjust MTU parameter for the internal tunnel accordingly to avoid fragmentation and throughput degradation.
In conclusion, I would like to demonstrate the WireGuard configuration file (key and port values have been modified) I use in order for Google Chrome to connect via VPN to all IP addresses except the local network, while all other applications bypass the VPN.
[Interface]
PrivateKey = AD9GaupPbRlfjPTfhLm1/lm5qtgwvFcB1rGpKOZkXXE=
Address = 10.66.66.2/32, fd42:42:42::2/128
DNS = 94.140.14.14, 94.140.15.15
MTU = 1420
[Peer]
PublicKey = tRb3/FxzJBhinaVPY/tyoX40PS7EY1mmzFyrL/dAnwY=
AllowedIPs = 0.0.0.0/0, ::/0
Endpoint = ora.sshvpn.me:51820
AllowedApps = chrome
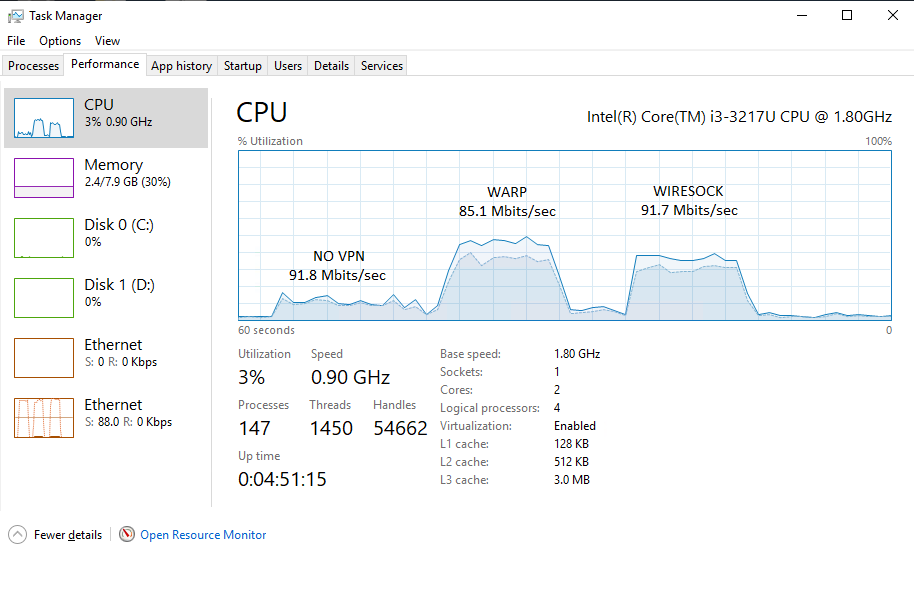
DisallowedIPs = 192.168.1.0/24WARP
Finishing this post, I decided to take a closer look at the Cloudflare WARP client for Windows. As it turned out, its architecture is close to that described above (there is no virtual adapter, traffic is intercepted by the filter driver) and the only significant difference is the driver used to capture packets. If we used Windows Packet Filter, then WARP uses WinDivert. The latter probably explains the higher CPU usage in the screenshot below.