
This tutorial goes through the process of setting up a VPN chain using WireGuard on Windows. There are a plenty of tutorials on the Internet devoted to “chaining” VPN servers, however most of them are Linux-based and require certain technical skill. In the previous post we already learned how to set up WireGuard VPN Server on Windows and here we will use this knowledge to forge a VPN chain from two Windows hosts using WireGuard and WireSock.
We will also try to answer the question I found on Reddit. Here is a key quote:
So this is solution but i’m not expert in Linux so I didn’t know how to do it technically
the solution?
1. buy one VPS Server located in Iran.
2. buy one VPS Server located out of Iran (Europe or USA)
3. tunnel Iran VPS to out side VPS
so when I connect to Iran VPS from my home or office , all my packet send to vps out of Iran. and from that VPS , we can access to internet.
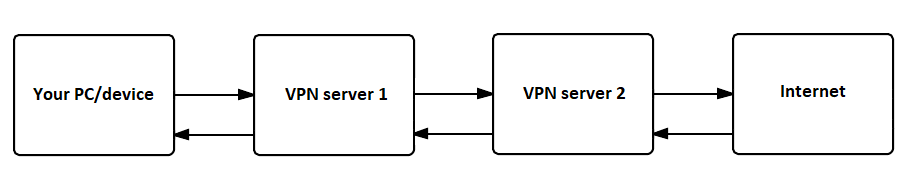
The idea is not new and quite straightforward: the client connects to the first WireGuard Server, which instead of forwarding the client’s traffic directly to the Internet tunnels it to the second WireGuard Server, which in its turn forwards it to the Internet. You can add even more VPN servers in between, but remember that it may result in a major loss of speed.
An important note about this setup is that all WireGuard Servers in the chain have complete access to the unencrypted client’s traffic. To avoid this, we could consider “nesting” one tunnel into another, so that only the last VPN server in the chain could completely decrypt it. However, it would result in an increased CPU consumption on the client (double encryption) and decreased throughput due to the smaller per route MTU. Besides this, WireGuard clients for Android and iOS don’t support more than one active tunnel, and thus we are not going to consider “nested” WireGuard tunnels in this post.
If you are concerned about your privacy, then double-hop VPN can make it at least twice as difficult to identify you. For example, if you are worried about being traced by NSA, then double-hoping through servers located in Russia or China may significantly complicate your communications surveillance.
We are not going to consider VPS configurations (and providers) suitable for your WireGuard VPN Servers because there are many factors dependent on your requirements. However, if you feel comfortable with Windows Server Core, then VPS with 1 CPU and 1 GB of RAM should be sufficient for the basic needs.
The quick and easy process of setting up the WireGuard VPN Server on Windows is described here. If you chose Windows Server Core 2016/2019 for your VPS, then it is just a little more complicated than doing the same on the Desktop. You only need to copy & paste five PowerShell commands before starting wg-quick-config utility.
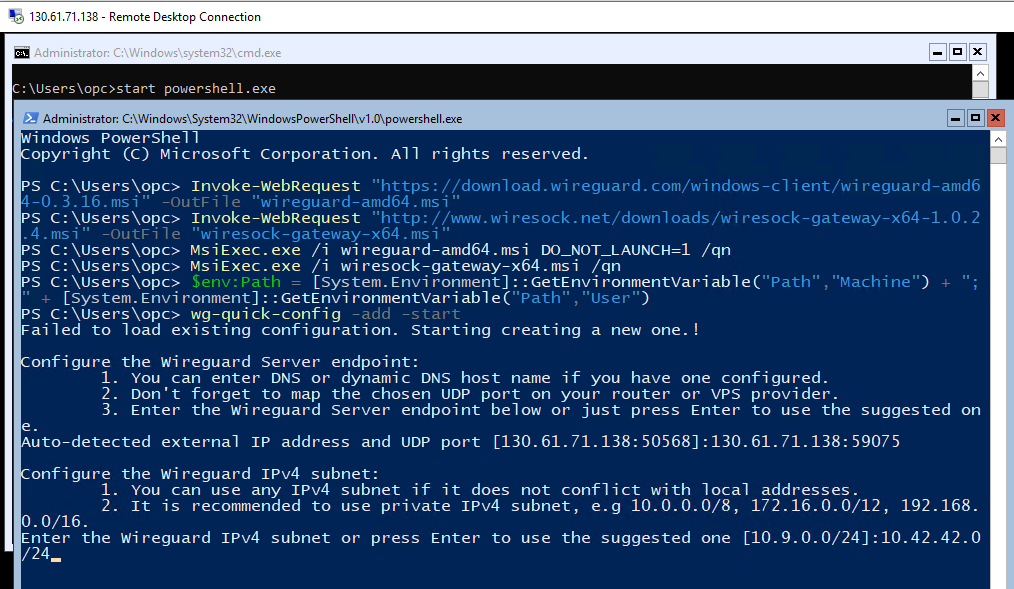
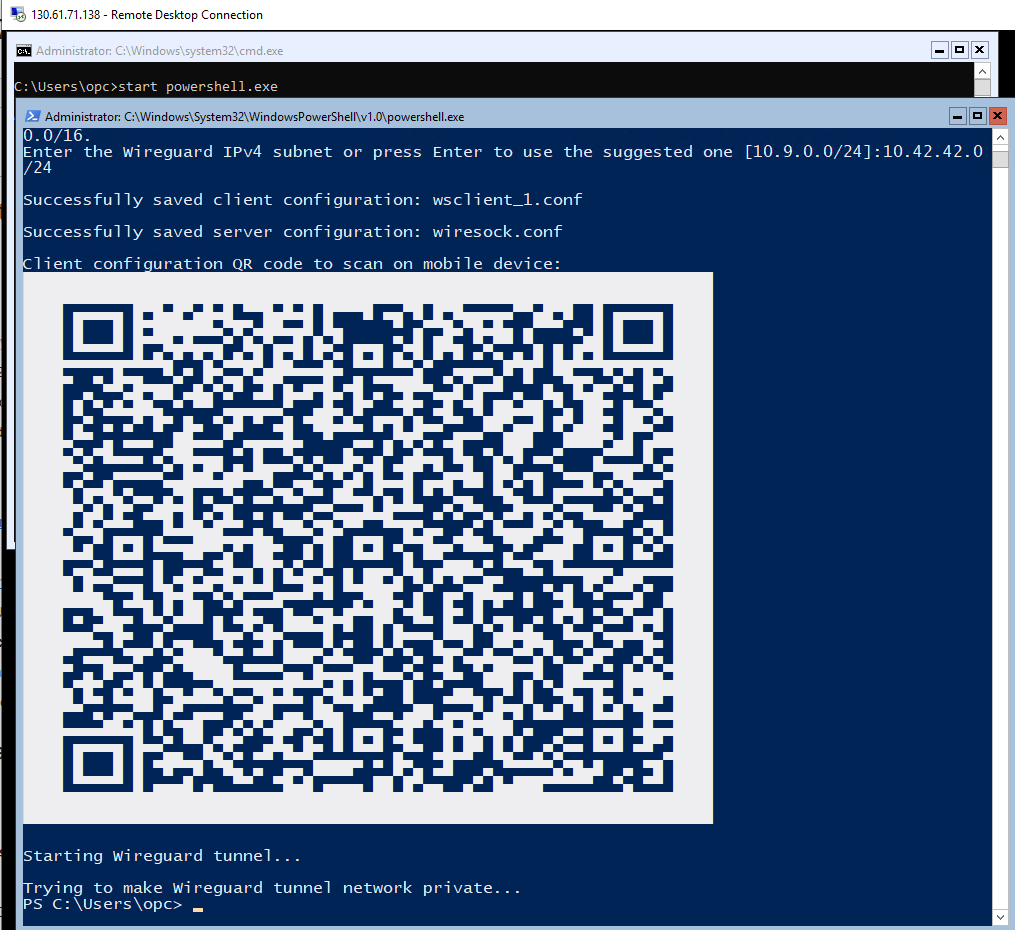
When started with -add -start parameters for the first time wg-quick-config creates configuration files for the server (wiresock.conf) and client (wsclient_1.conf), next it creates and launches the WireGuard tunnel using wiresock.conf. It also displays the client configuration as a QR code that can be scanned by a smartphone. Additional VPN clients can be added by calling wg-quick-config -add -restart.
Until this moment, the process is identical for both VPN Server 1 and VPN Server 2 and as a result, you should get two running WireGuard VPN Servers on Windows. You can check the connectivity to each of them and if there are any issues just reboot the machine. WireSock Gateway is based on Windows Packet Filter NDIS filter and in some relatively rare cases the reboot after the driver install/reinstall is required.
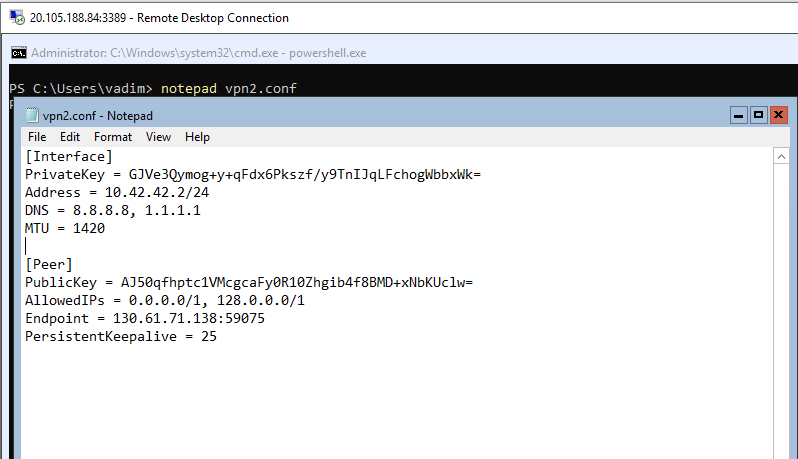
Let’s connect VPN Server 1 and VPN Server 2 over WireGuard tunnel. To do that on the VPN Server 2 open wsclient_1.conf using notepad.exe, copy the content of this file into the clipboard and then paste the into the locally running notepad, we need to edit it a little.
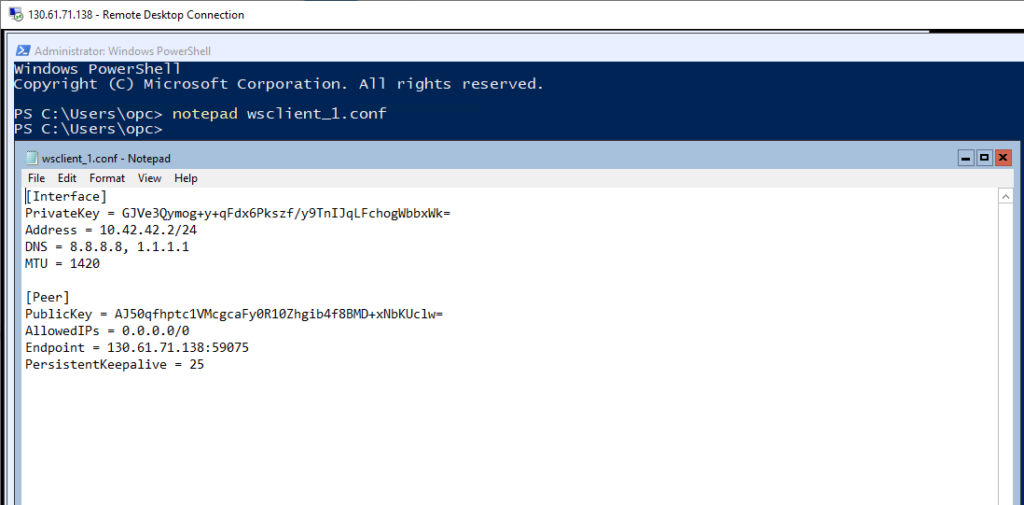
In particular, we need to enable split tunneling in this client config because VPN Server 1 will be running two tunnels simultaneously. It is straightforward to do, just replace AllowedIPs = 0.0.0.0/0 to AllowedIPs = 0.0.0.0/1, 128.0.0.0/1. The resulted config is below:
[Interface]
PrivateKey = GJVe3Qymog+y+qFdx6Pkszf/y9TnIJqLFchogWbbxWk=
Address = 10.42.42.2/24
DNS = 8.8.8.8, 1.1.1.1
MTU = 1420

[Peer]
PublicKey = AJ50qfhptc1VMcgcaFy0R10Zhgib4f8BMD+xNbKUclw=
AllowedIPs = 0.0.0.0/1, 128.0.0.0/1
Endpoint = 130.61.71.138:59075
PersistentKeepalive = 25
Now create a new config file on VPN Server 1 named vpn2.conf, paste the resulted configuration and save.
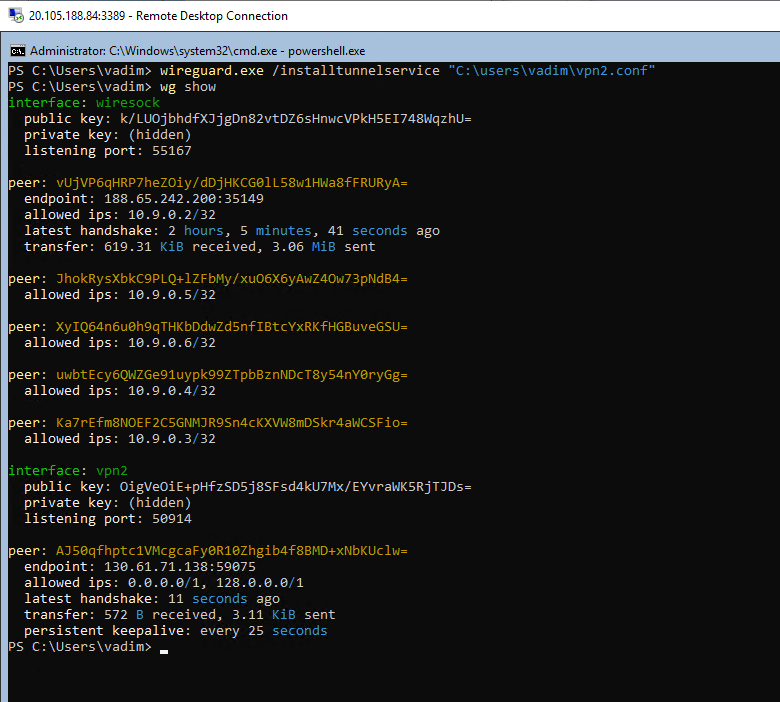
There are two options to launch VPN Server 1 to VPN Server 2 tunnel. First and probably the easiest one is using the WireGuard GUI client to import and start the tunnel config we’ve just created. However, for this tutorial I’ve set a couple of Windows Core Server 2019, so let’s do it in PowerShell. wireguard.exe /installtunnelservice "C:\users\vadim\vpn2.conf" creates the background tunnel from VPN Server 1 to VPN Server 2. You can check the current WireGuard configuration by running wg show (screenshot below).
Now if you connect to VPN Server 1 using WireGuard client and check your external IP address you will notice that it belongs to VPN Server 2.
However, if you run DNS leak test, then you will notice that it reports both VPN Server 1 and VPN Server 2 DNS servers. This happens because by default, WireSock Gateway uses a local DNS server to speed up DNS resolutions. And obviously, it may be undesired behavior in case of double-hop VPN where you would probably want to delegate all DNS resolutions to VPN Server 2.
Luckily, this is easy to fix. WireSock Gateway service has a special command line parameter which defines DNS servers to use. So, just start cmd as Administrator on VPN Server 1 and reconfigure WireSock service to use the chosen DNS servers. In the example below, we set DNS servers to 1.1.1.1 and 1.0.0.1:
wiresock-service uninstall
wiresock-service install -start-type 2 -mode proxy -interface wiresock -log-level none -dns "1.1.1.1, 1.0.0.1"
sc start wiresock-service
If you re-run DNS leak test, you will notice that VPN Server 1 is not reported anymore.
Important note
Please avoid trying to chain WireGuard tunnels using wiresock-service running in NAT mode because you risk losing the network connectivity. After the quick research, I have found out that the problem is caused by EnableRouter function internally called by wiresock-service to utilize the Window’s built-in routing. When called with WireGuard client connection active, it results in routing WireGuard transport UDP packets from the default network adapter to the WireGuard interface, breaking the tunnel and subsequently the network connectivity.