
Here’s a step-by-step guide on how to create a personal, cost-free SOCKS5 anonymous proxy with support for UDP ASSOCIATE (as specified in RFC1928) in Oracle Cloud. I documented these steps for myself while setting up the SOCKS5 proxy for the purpose of experimenting with forwarding WireGuard handshake packets over SOCKS5. However, I later decided to share this information with the community. My chosen solution was Dante, developed by Inferno Nettverk A/S, running on an Ubuntu 20.04 instance in Oracle Cloud. Thanks to Oracle for providing ample resources through the Oracle Cloud Free Tier to meet my needs.
Install Ubuntu Instance
We will use an Oracle Cloud Infrastructure Free Tier account to set up a compute instance on the latest version of Ubuntu.
Before You Begin
To successfully complete the steps below, you must have the following:
- An Oracle Cloud Infrastructure Free Tier account. Start for Free.
- A MacOS, Linux, or Windows computer with
sshsupport installed.
Install your Ubuntu Linux Instance
Use the Create a VM Instance wizard to create a new compute instance.
The wizard does several things when installing the instance:
- Creates and installs a compute instance running Ubuntu Linux.
- Creates a VCN with the required subnet and components needed to connect your Ubuntu Linux instance to the internet.
- Creates an
sshkey pair you use to connect to your instance.
To get started installing your instance with the Create a VM instance wizard, follow these steps:
- From the main landing page, select Create a VM instance wizard.
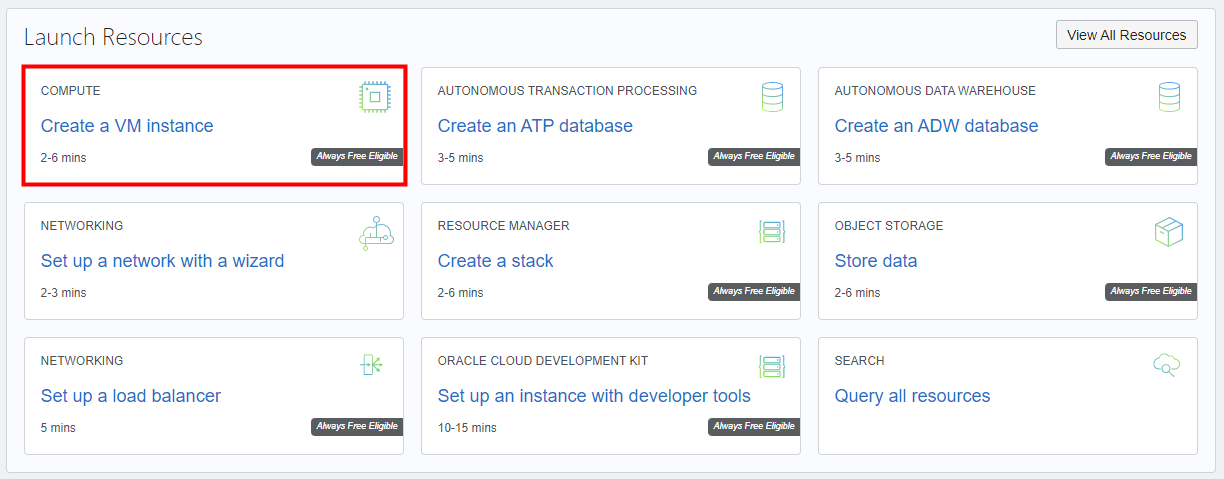 The Create compute instance page is displayed. It has a section for Placement, Image and shape, Networking, Add SSH keys, and Boot volume.
 - Choose the Name and Compartment. Initial Options
- Name:
<name-for-the-instance> - Create in compartment:
<your-compartment-name>Enter a value for the name, or leave the system supplied default.
- Name:
- Review the Placement settings.
- Click Edit.
- Click the Show advanced options link.
- Take the default values. Your data might look similar to the following: Availability domain
- Availability domain: AD-1
- Capacity type: On-demand capacity
- Fault domain: Let Oracle choose the best fault domain
- Review the Image and shape settings.
- Select the latest Ubuntu image. Click Edit.
- Click Change image.
- Select the latest Ubuntu image.
- Click Select image. Your image is displayed, for example your data looks similar to the following: ImageImage: Canonical Ubuntu 20.04
- Image build:
<current-build-date>
- Take the default values for Shape. For example, your data looks similar to the following: ShapeShape: VM.Standard.E2.1.Micro
- OCPU: 1
- Memory (GB): 1
- Network bandwidth (Gbps): 0.48
- Select the latest Ubuntu image. Click Edit.
- Review the Networking settings. Take the default values provided by the wizard.
- Virtual cloud network:
vcn-<date>-<time> - Subnet:
vcn-<date>-<time> - Assign a public IPv4 address: Yes
- Virtual cloud network:
- Review the Add SSH keys settings. Take the default values provided by the wizard.
- Select the Generate a key pair for me option.
- Click Save Private Key and Save Public Key to save the private and public SSH keys for this compute instance.
- If you want to use your own SSH keys, select one of the options to provide your public key.
- Review the Boot volume settings. Take the default values provided by the wizard. Leave all check boxes unchecked.
- Click Create to create the instance. Provisioning the system might take several minutes.
You have successfully created an Ubuntu Linux instance to run your Dante SOCKS5 proxy server.
Enable Internet Access
The Create a VM Instance wizard automatically creates a VCN for your VM. You add an ingress rule to your subnet to allow internet connections on TCP port 1080 and UDP port range 40000-45000.
Follow these steps to select your VCN’s public subnet and add the ingress rule.
- Open the navigation menu and click Networking, and then click Virtual Cloud Networks.
- Select the VCN you created with your compute instance.
- With your new VCN displayed, click <your-subnet-name> subnet link. The public subnet information is displayed with the Security Lists at the bottom of the page. A link to the Default Security List for your VCN is displayed.
- Click the Default Security List link. The default Ingress Rules for your VCN are displayed.
- Click Add Ingress Rules. An Add Ingress Rules dialog is displayed.
- Fill in the ingress rule with the following information. Fill in the ingress rule as follows:
- Stateless: Checked
- Source Type: CIDR
- Source CIDR: 0.0.0.0/0
- IP Protocol: TCP
- Source port range: (leave-blank)
- Destination Port Range: 1080
- Description: Allow SOCKS5 TCP connections
- Click Add Ingress Rules. Now SOCKS5 connections are allowed.
- Now we need an ingress rule to allow UDP connections. Click Add Ingress Rules. An Add Ingress Rules dialog is displayed.
- Fill in the ingress rule with the following information. Fill in the ingress rule as follows:
- Stateless: Checked
- Source Type: CIDR
- Source CIDR: 0.0.0.0/0
- IP Protocol: UDP
- Source port range: (leave-blank)
- Destination Port Range: 40000-45000
- Description: Allow SOCKS5 UDP ASSOCIATE
- Click Add Ingress Rules. Now SOCKS5 UDP ASSOCIATE connections are allowed. Your VCN is configured for Dante SOCKS5 server.
You have successfully created an ingress rules that makes your instance available from the internet.
Install and configure Dante SOCKS5 proxy
To install and set up Dante server, perform the following steps:
- Open the navigation menu and click Compute. Under Compute, click Instances.
- Click the link to the instance you created in the previous step. From the Instance Details page look under the Instance Access section, the Public IP Address field. Write down the public IP address the system created for you. You use this IP address to connect to your instance.
- Open a Terminal or Command Prompt window.
- Change into the directory where you stored the
sshencryption keys you created before. - Connect to your instance with this SSH command.
ssh -i <your-private-key-file> ubuntu@<x.x.x.x>Since you identified your public key when you created the instance, this command logs you into your instance. You can now issue sudo commands to install and start your server.
Installing Dante
Execute the following to install the Dante server:
$ sudo apt update
$ sudo apt install dante-server
Check Dante version:
$ danted -v
Dante v1.4.2.  Copyright (c) 1997 - 2014 Inferno Nettverk A/S, Norway
We must check the server interface, in the example below, the server uses the ens3 interface.
$ ip a
1: lo: <LOOPBACK,UP,LOWER_UP> mtu 65536 qdisc noqueue state UNKNOWN group default qlen 1000
    link/loopback 00:00:00:00:00:00 brd 00:00:00:00:00:00
    inet 127.0.0.1/8 scope host lo
       valid_lft forever preferred_lft forever
    inet6 ::1/128 scope host
       valid_lft forever preferred_lft forever
2: ens3: <BROADCAST,MULTICAST,UP,LOWER_UP> mtu 9000 qdisc pfifo_fast state UP group default qlen 1000
    link/ether 02:00:17:02:26:bd brd ff:ff:ff:ff:ff:ff
    altname enp0s3
    inet 10.0.0.196/24 brd 10.0.0.255 scope global ens3
       valid_lft forever preferred_lft forever
    inet6 fe80::17ff:fe02:26bd/64 scope link
       valid_lft forever preferred_lft forever
Before changing the configuration, make a backup of the default configuration.
$ sudo mv /etc/danted.conf /etc/danted.conf.bakThen edit the Dante configuration:
$ sudo nano /etc/danted.confCopy and paste the configuration below:
logoutput: /var/log/socks.log
internal: ens3 port = 1080
external: ens3
clientmethod: none
socksmethod: none
user.privileged: root
user.notprivileged: nobody

client pass {
        from: 0.0.0.0/0 to: 0.0.0.0/0
        log: error connect disconnect
}
client block {
        from: 0.0.0.0/0 to: 0.0.0.0/0
        log: connect error
}
socks pass {
        from: 0.0.0.0/0 to: 0.0.0.0/0
        udp.portrange: 40000-45000
        #command: udpassociate
        log: error connect disconnect
}
socks block {
        from: 0.0.0.0/0 to: 0.0.0.0/0
        log: connect error
}
Start and check if Dante is running normally:
$ sudo systemctl start danted
$ systemctl status danted
Set automatic Dante start after reboot:
$ sudo systemctl enable danted
Synchronizing state of danted.service with SysV service script with /lib/systemd/systemd-sysv-install.
Executing: /lib/systemd/systemd-sysv-install enable danted
Configure iptables
To allow access to your Dante server, you should add the rules to allow incoming TCP to port 1080 and UDP for the port range 40000-45000. If you don’t have iptables-persistent yet, then please consider installing it to reload rules after system reboot (note that commands below are executed as a root):
$ sudo su
# iptables -I INPUT -p tcp -m state --state NEW -m tcp --dport 1080 -j ACCEPT
# iptables -I INPUT -p udp --dport 40000:45000 -j ACCEPT
# iptables-save > /etc/iptables/rules.v4
# exit
Dante Socks5 Test
curl -x socks5://<your_ip_server>:<your_danted_port> ifconfig.coExample output of the command:
$ curl -x socks5://oracle3.sshvpn.me:1080 ifconfig.co
130.162.32.218
If when doing a test it turns out that it failed, you can check the Dante log on /var/log/socks.log
Limit Access
Now we have a Dante server with anonymous access and this might not be a good idea. To restrict access to your server by IP address you can either:
- Alter the iptables rules we used above or update
/etc/danted.confto accept connections only from the specified IP address. - Configure Dante to support username/password authentication.
Limit by IP Address
In the previous danted configuration, we gave public access to all IPs to connect to our proxy server. In this step, we will limit access to only one or several IPs.
Edit Danted Configuration on /etc/danted.conf, and change this section:
client pass {
        from: 201.100.103.1/32 to: 0.0.0.0/0
        log: error connect disconnect
}201.100.103.1/32is the single IP you want to allow access to your proxy server.
If you want to add another single IP again, just repeat the configuration.
client pass {
        from: 201.100.103.1/32 to: 0.0.0.0/0
        log: error connect disconnect
}
client pass {
        from: 202.101.100.1/32 to: 0.0.0.0/0
        log: error connect disconnect
}
Save and restart using systemctl restart danted.
If you want to give a range or block of IPs access, change the slash behind the IP to your IP block.
Limit by Username
For the second option you should change socksmethod: none in /etc/danted.conf to socksmethod: username and restart Dante.
$ sudo systemctl restart dantedDante uses Linux system authentication, so it’s a good idea to create a separate user account that will be used only socks authentication, and it will be impossible to use this user to log in:
$ sudo su
# useradd -r -s /bin/false danteuser
# passwd danteuser
Use the following command to test the login with your username and password:
curl -x socks5://<your_username>:<your_password>@<your_ip_server>:<your_danted_port> ifconfig.coExample output of the command with username and password:
$ curl -x socks5://danteuser:[email protected]:1080 ifconfig.co
130.162.32.218
and without:
$ curl -x socks5://oracle3.sshvpn.me:1080 ifconfig.co
curl: (97) No authentication method was acceptable.
We are done! Hope you will find it useful.