
Effortlessly Route qBittorrent Traffic Through Wireguard VPN Using WireSock VPN Client and WireSockUI
In this tutorial, we delve into the world of enhanced online privacy and efficiency by demonstrating how to selectively route qBittorrent traffic through a Wireguard VPN, utilizing the WireSock VPN Client and its GUI counterpart, WireSockUI.
This guide is tailored for users who seek to balance the need for privacy in specific applications, like torrenting, with the desire for unrestricted internet access for their other online activities. By the end of this tutorial, you will have a robust setup that ensures your qBittorrent traffic is securely tunneled through a VPN, while the rest of your internet traffic remains unaffected. Whether you’re a seasoned techie or new to VPNs and torrenting, this guide will walk you through each step with clarity and detailed instructions.
Let’s embark on this journey towards a more secure and efficient online experience.
Introduction to Split Tunneling with Wireguard and WireSock
In the realm of online privacy and security, VPNs (Virtual Private Networks) have become a cornerstone. However, traditional VPN setups often route all your internet traffic through the VPN server, which can be unnecessary for certain applications and may slow down your connection. This is where split tunneling comes into play, offering a more tailored solution.
Split tunneling allows you to selectively route only specific applications or traffic through the VPN while keeping the rest of your internet activity on your regular network. This approach is particularly beneficial for torrenting applications like qBittorrent, where privacy is paramount, but you don’t want to compromise on the speed and accessibility of your other online activities.
Why Choose Wireguard and WireSock for Split Tunneling?
WireGuard is a modern VPN protocol known for its simplicity and high-speed performance. It represents a more efficient and secure approach to VPN connections compared to older protocols. However, the standard WireGuard implementation for Windows might lack certain advanced features.
This is where the WireSock VPN Client comes into play. As an effective WireGuard VPN client, WireSock provides features not available in the genuine WireGuard for Windows implementation. Combined with its GUI interface, WireSockUI, it elevates the WireGuard experience to a new level. WireSock significantly enhances WireGuard’s capabilities, particularly in terms of split tunneling. It simplifies the management of VPN connections, allowing users to easily specify which applications should use the VPN and which should not. This combination of WireGuard’s robust protocol and WireSock’s advanced features makes for a powerful tool in any user’s privacy toolkit.
Setting the Stage for Advanced Split Tunneling
Our guide focuses on using qBittorrent with Wireguard VPN, facilitated by WireSock VPN Client and WireSockUI. This setup ensures that your torrenting activities are securely routed through the VPN, protecting your privacy without affecting the rest of your internet traffic. Whether you’re downloading legal open-source software, sharing large files, or simply ensuring your torrenting activities are private, this guide will provide you with the tools and knowledge to set up an efficient and secure environment.
In the following sections, we’ll walk you through the necessary steps to configure your system for split tunneling, from installing the required software to testing and verifying your setup. Let’s get started on creating a more secure and efficient torrenting experience.
Step-by-Step Guide: Configuring Your Split Tunneling Setup
1. Preparing Your Tools
Before diving into the setup, ensure you have the following components ready:
- WireSock VPN Client: This is the backbone of your split tunneling setup. Download and install it from the official WireSock website.
- WireSockUI: A user-friendly interface for managing your Wireguard connections through WireSock. Download the latest release from GitHub.
- qBittorrent: Our chosen torrent client for this guide. It’s known for its user-friendly interface and robust features.
- Wireguard Configuration File: You can obtain this from your VPN provider, which contains the necessary details to connect to your VPN server. Alternatively, for those with more technical expertise, setting up your own VPN server on a VPS (Virtual Private Server) hosted in a desired location is also a viable option. This approach allows for greater control over your VPN server’s location and configuration, potentially enhancing your privacy and connection speed.
2. Installing and Configuring WireSock VPN Client
- Download and Install: Visit the WireSock website, download the client, and follow the installation instructions.
- Configuration: After installation, you don’t need to configure anything immediately. WireSockUI will use it in the background.
3. Setting Up WireSockUI
- Download and Extract: Get WireSockUI from its repository and extract it to a preferred location.
- Launch and Configure: Open WireSockUI and navigate to the settings. Here, enable ‘Virtual Network Adapter’ mode. This step is important not specifically for split tunneling itself, but for enhancing security. The virtual adapter allows you to bind qBittorrent exclusively to it, ensuring that your BitTorrent traffic does not leak outside the VPN tunnel, especially when the VPN is inactive. This adds an extra layer of protection to your setup.
- VPN Tunnel Setup: Add your VPN tunnel using the ‘Add Tunnel’ option and select your Wireguard configuration file.
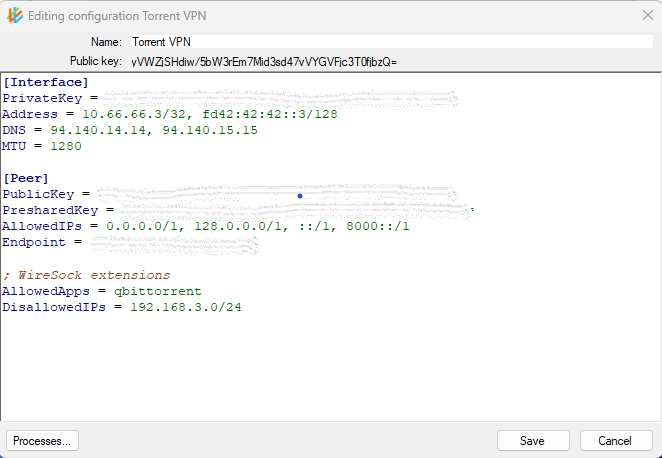
4. Customizing the VPN Tunnel
- Edit Configuration: In the Wireguard configuration file, specify which applications should use the VPN. For qBittorrent, add
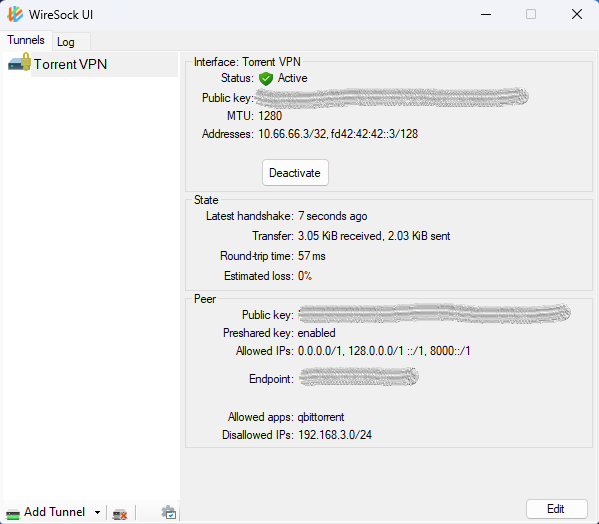
AllowedApps = qbittorrent. If you prefer to blacklist certain apps instead, useDisallowedApps = [app_name]. - Activate the Tunnel: Once configured, activate the tunnel in WireSockUI. This will route the specified app’s traffic through the VPN.
5. Configuring qBittorrent
- Open qBittorrent Settings: Navigate to ‘Options’ > ‘Advanced’.
- Select Network Interface: In the ‘Network Interface’ dropdown, select the WireSock Virtual Adapter. It’s important to note that the VPN adapter in this list will be named after your tunnel name in WireSockUI. This selection ensures that qBittorrent only uses the VPN connection for its traffic, effectively preventing any BitTorrent traffic leakage when the VPN is not active.

6. Testing and Verification
- Visit ipleak.net: This website allows you to check which IP address your torrent client is using.
- Test Torrent Detection: Use the torrent detection tool on ipleak.net to verify that the IP address shown matches that of your VPN, not your real IP.
Conclusion: Ensuring a Secure Torrenting Experience
By following these steps, you’ve successfully configured qBittorrent to route its traffic through a Wireguard VPN using WireSock and WireSockUI for split tunneling. This setup provides a balance between privacy for sensitive activities and optimal speed for regular browsing. Remember, the key to maintaining a secure and efficient setup is regular testing and staying updated with your software tools.
It would have been great, if you could have explained the specific IP ranges and why you set them like that and if they are related only to your specific vpn tunnel provider, or if they are important to route all IPs through that.
I usually only see 0.0.0.0/0 for AllowedIPs.
So does the split tunnel magic happens due to winsock itself? Or are the ip ranges you specified helping wiresock to reroute only a part of the traffic? Because when I use just the normal wireguard client, and use AllowedIPs = 0.0.0.0/0 it reroutes ALL the computers traffic through the tunnel.
You are correct. Typically, in a standard WireGuard client, setting “AllowedIPs = 0.0.0.0/0” redirects all of the computer’s traffic through the tunnel. This applies to Wiresock as well. However, the behavior changes when you include “AllowedApps = qbittorrent” in the configuration file. With this addition, only the traffic from qBittorrent, destined for any IP address (0.0.0.0/0), will be routed through the tunnel, while traffic from all other applications will follow its usual path.
So I had some time to test WinSock with WinSockUI, here is what I found:
Using AllowedIPs = 0.0.0.0/0:
– when using
AllowedApps: qbittorrent ( DisallowApps and DisAllowIPs are disabled )
-> It blocks chrome ip4 traffic completely so the browser falls back to ip6 traffic. Some websites load, some don’t. It definitely affects speed and loading time.
– ipleak.net shows: ip4 disabled, ipv6 remains the original address
When using AllowedApps: qbittorrent, chrome ( DisallowApps and DisAllowIPs are disabled )
– it tunnels chrome traffic,
– ipleak.net shows: ip4 ip of wireguard server correctly, ipv6 remains the original
So there is definitely a ipv6 leak happening, I also tested the original wireguard windows client and it is the same. The problem I have is though, that although split tunneling does happen somewhat, when I only set AllowedApps to qbittorrent alone, it seems to start blocking all other apps for the whole ip4 range and falls back to ipv6 addresses. Some websites are only reachable via ip4 and those are not loaded.
I tried to replicate the problem under various time frames, waiting 5s, 10s, 15s, before reestablishing the wireguard connection, closing and opening the apps again to prevent dns caching, but the result remains the same. WireSock seems to block other applications from connecting to other ipv4 addresses. An example would be irc client that fails to connect to a liberia server, which uses an ip4 address. Popular websites like facebook, youtube and google have a fallback ipv6 address and are still reachable, so one might not notice it.
I experience the occasional WiresockUI crash when enabling or disabling connections, which might relate to wiresock getting unresponsive and crashing with it Wiresock UI.
Also: Logging levels seem to only implemented for None or Full logs. Full logs are a bit verbose.
I found that this is a good project and hope you continue to develop this! I just wished split tunneling wouldn’t block other apps from using ip4 ranges.
Allowing qBittorrent in the split tunneling settings generally should not interfere with Chrome’s IPv4 traffic. However, you might experience some latency increases when qBittorrent is managing numerous active torrents. This latency can occur because of the frequent starting and stopping of TCP sessions. Such activity demands more from the packet filter engine, particularly in the context of connection application lookups, which are resource-intensive. This can, in turn, slightly affect the performance of other applications. While I’m aware of this issue and intend to address it in future updates, it hasn’t been a major problem for most users to date.
Regarding IPv6 traffic, it will be tunneled through WireGuard if your setup includes IPv6 support. If not, IPv6 traffic will not use the tunnel.
The issue you’re facing with Chrome defaulting to IPv6 might be related to DNS configurations, but this requires further investigation. Analyzing your settings, as well as reviewing WireSock logs and pcap files, could shed light on the problem. Keep in mind, if DNS is configured within WireGuard, all DNS queries will be routed through the tunnel.
It’s also crucial to consider whether you’re using Transparent mode or Virtual Adapter mode, as each mode has a slightly different implementation.
Thanks a lot!!! Mullvad was a pain to setup split tunneling for certain apps.